MakeUGC Platform API Documentation

Overview

The MakeUGC Platform API allows partners to programmatically generate AI-powered videos using our platform. This documentation provides details on authentication, endpoints, and usage examples.

Authentication

All API requests require authentication using an API key. Include your API key in the request headers:

X-Api-Key: YOUR_API_KEY

Base URL

https://app.makeugc.ai/api/platform

Using Claude Code / Claude Desktop? See §7 Connect MakeUGC MCP (https://mcp.makeugc.ai).

Endpoints

1. Get Available Avatars

Retrieve a list of available avatars (both template and custom).

GET /video/avatars

Query Parameters:

Response:

{
  "status": true,
  "message": "Avatars fetched",
  "data": [
    {
      "id": "avatar_123",
      "name": "Avatar Name",
      "thumbnail": "https://...",
      "gender": "Male"
    }
  ]
}

Status Codes:

2. Get Available Voices

Retrieve a list of available voices (template voices and the current user's custom voices).

GET /video/voices

Query Parameters:

Response:

{
  "status": true,
  "message": "Voices fetched",
  "data": [
    {
      "id": "voice_123",
      "name": "Voice Name",
      "language": "English",
      "gender": "Female",
      "templateUrl": "https://...",
      "thumbnail": "https://...",
      "voiceId": "internal_tts_voice_id",
      "accent": "US",
      "country": "United States",
      "isCustom": false
    }
  ]
}

Status Codes:

3. Video Generation

Generate Video

Creates a new AI video with specified avatar and voice script.

POST /video/generate

Request Body:

{
  "avatar_id": "string",     // Required: ID of the avatar to use
  "voice_script": "string",  // Required: Script for the voice (max 1500 chars)
  "video_name": "string",    // Optional: Custom name for the video (defaults to "API Generated Video")
  "voice_url": "string",     // Optional: URL to existing audio (if provided, skip voice generation; max duration 120s)
  "voice_id": "string",      // Optional: ID Voice actor, if not provide -> using voice default of avatar template
  "voice_settings": {        // Optional: Voice generation settings
    "stability": 0.75,       // Range: 0-1
    "similarity_boost": 0.4, // Range: 0-1
    "style": 0,             // Range: 0-1
    "use_speaker_boost": true
  },
  "webhook_url": "string"    // Optional: Webhook URL for status callbacks
}

Audio source priority: voice_urlvoice_id → avatar default voice. If voice_url is invalid/inaccessible or duration is greater than 120 seconds, the request is rejected.

Response:

{
  "status": true,
  "message": "Video generation started",
  "data": {
    "id": "video_123"  // Use this ID to check video status
  }
}

Status Codes:

Check Video Status

Check the status of a video generation request.

GET /video/status

Query Parameters:

Response:

{
  "status": true,
  "message": "Video is processing",
  "data": {
    "status": "processing" | "completed" | "failed",
    "url": "https://..." // Present when status is "completed"
  }
}

Status Codes:

Rate Limits

Important Notes

4. Custom Avatar

Generate Custom Avatar

Create a custom avatar from an image and optional voice sample. Uses multipart/form-data.

POST /custom-avatar/generate

Request Body (multipart/form-data):

image    (required)  — Image file (max 10MB) or URL string
voice    (optional)  — Voice audio file (max 10MB) or URL string

Input flexibility: Both image and voice accept either a direct file upload or a publicly accessible URL string. Files are uploaded to S3 automatically.

Response:

{
  "status": true,
  "data": {
    "status": true,
    "message": "Custom avatar created",
    "avatar_id": "avatar_456",
    "thumbnail_url": "https://...",
    "audio_url": "https://...",
    "selected_voice_id": "voice_789"
  }
}

Status Codes:

Rate Limits

Important Notes

5. Product-in-Hand Generation

Generate Product-in-Hand videos dynamically using different models.

Generate (Nova V2)

POST /product-in-hand/nova-v2/generate

Model limits: Audio duration max 90 seconds.

Request Body:

{
  "image_url": "string",     // Required: Image URL of the product/subject
  "script": "string",        // Required (if voice_url missing): Script for TTS
  "voice_url": "string",     // Optional: Direct audio URL (skips TTS generation)
  "voice_id": "string",      // Required (if voice_url missing): Voice actor ID
  "project_id": "string",    // Optional: Project ID
  "webhook_url": "string"    // Optional: Webhook URL for status callbacks
}

Response:

{
  "status": true,
  "message": "Video generation started",
  "data": { "id": "video_123" }
}

Credits: 1 credit per generation.

Generate (Omi-Human)

POST /product-in-hand/omi-human/generate

Model limits: Audio duration max 30 seconds.

Request Body:

// Same as Nova V2 payload.
// image_url is required, along with either voice_url OR script.
// webhook_url is also supported.

Credits (Dynamic pricing):
< 15s : 1 credit
15s - 30s : 2 credits

Generate (Veo)

POST /product-in-hand/veo/generate

Request Body:

{
  "image_url": "string",     // Required: Video thumbnail/first-frame URL
  "project_id": "string",    // Optional: Project ID
  "model": "string",         // Optional: "pro" or "fast"
  "voice_id": "string",      // Optional: TTS Voice ID
  "end_image_url": "string", // Optional: Target ending frame URL
  "scenes": [                // Required: Array (1-4 scenes)
    {
      "script": "string",
      "description": "string"
    }
  ],
  "webhook_url": "string"    // Optional: Webhook URL for status callbacks
}

Credits: scenes.length * (model === 'pro' ? 2 : 1)

Get Status

GET /product-in-hand/status?id={video_id}

Retrieve the status of a generated PIH video.

Response (Processing):

{
  "status": true,
  "message": "Video is processing",
  "data": { "status": "processing" }
}

Response (Completed):

{
  "status": true,
  "message": "Video is completed",
  "data": {
    "status": "completed",
    "url": "https://cloudfront.net/signed-url.mp4"
  }
}

Response (Failed):

{
  "status": true,
  "message": "Video is failed",
  "data": {
    "status": "failed",
    "reason": "Request timeout due to high load"
  }
}

6. Shopable (Shopify-optimized)

Async product image/video generation optimized for Shopify. Upstream worker docs: /api/platform/shopable/ShoppableAPI.md.

List packs

GET /shopable/packs

Categories, allowed formats, and defaults.

Generate image

POST /shopable/images

{
  "category": "general",
  "format": "kinetic_start_frame",
  "context": "premium clean tone, product hero",
  "image_url": "https://cdn.example.com/product.png",
  "aspect_ratio": "9:16"
}

Poll: GET /shopable/images/status?id={id}

Generate video

POST /shopable/videos

{
  "category": "general",
  "format": "kinetic_packshot",
  "context": "premium product motion, clean CTA",
  "image_urls": ["https://cdn.example.com/product.png"],
  "duration": "7",
  "aspect_ratio": "9:16"
}

Poll: GET /shopable/videos/status?id={id}

Normalized status matches Product-in-Hand (processing / completed / failed + url).

7. Content Library

Generate videos from pre-built Content Library templates. List templates to discover required fields, then generate and poll by db_id.

List Templates

GET /content-library/templates

Query Parameters:

Response:

{
  "status": true,
  "message": "Templates retrieved successfully",
  "data": [
    {
      "id": "template_uuid",
      "title": "Template title",
      "description": "...",
      "credit": "1",
      "preview_url": "https://...",
      "category": ["hook", "ugc"],
      "require_fields": {
        "product_name": { "type": "input", "label": "Product name" },
        "product_image": { "type": "image", "label": "Product image" },
        "script": { "type": "textarea", "label": "Script", "max": 400 }
      }
    }
  ]
}

List Categories

GET /content-library/categories

Response:

{
  "status": true,
  "message": "Categories retrieved successfully",
  "data": [
    { "label": "All", "value": "all" },
    { "label": "hook", "value": "hook" }
  ]
}

Generate Video

POST /content-library/generate

Start a video generation job from a template. Dynamic body fields must match require_fields from the list templates response.

Request Body:

{
  "template_id": "string",       // Required: Template UUID from list templates
  "project_id": "string",        // Optional: Auto-creates a project if omitted
  "webhook_url": "string",       // Optional: HTTPS URL for terminal job callbacks (see Webhook Callback)
  "product_name": "string",      // Example dynamic field (input)
  "product_image": "string",     // Example dynamic field (image) — must be public https URL
  "script": "string"             // Example dynamic field (textarea)
}

Notes:

Response:

{
  "status": true,
  "message": "Video generation started",
  "data": { "db_id": "uuid" }
}

Webhook Callback

When webhook_url is provided on generate, your endpoint receives an HTTP POST with Content-Type: application/json when the job reaches a terminal state. Use polling if you need a guaranteed delivery or miss a callback.

video_id in the payload corresponds to the db_id returned from generate.

Payload (completed):

{
  "event": "video2video.job.terminal",
  "job_id": "550e8400-e29b-41d4-a716-446655440000",
  "video_id": "660e8400-e29b-41d4-a716-446655440001",
  "status": "completed",
  "user_id": "user_123",
  "project_id": "proj_456",
  "template_id": "tpl_789",
  "template_type": "hook",
  "pipeline_id": "hook_default",
  "video_url": "https://s3.amazonaws.com/.../final.mp4",
  "thumbnail_url": "https://s3.amazonaws.com/.../thumb.jpg",
  "error": null,
  "completed_at": "2026-05-28T12:34:56.789123+00:00"
}

Payload (failed):

{
  "event": "video2video.job.terminal",
  "job_id": "550e8400-e29b-41d4-a716-446655440000",
  "video_id": "660e8400-e29b-41d4-a716-446655440001",
  "status": "failed",
  "user_id": "user_123",
  "project_id": "proj_456",
  "template_id": "tpl_789",
  "template_type": "hook",
  "pipeline_id": "hook_default",
  "video_url": null,
  "error": "Bootstrap validation failed: missing required field prompt",
  "completed_at": "2026-05-28T12:34:56.789123+00:00"
}

Payload (timed out):

{
  "status": "timed_out",
  "video_url": null,
  "error": "Job exceeded watchdog deadline"
}

Get Status

GET /content-library/status?id={db_id}

Poll generation status using the db_id returned from generate.

Response (Processing):

{
  "status": true,
  "message": "Video is processing",
  "data": { "db_id": "uuid", "status": "processing" }
}

Response (Completed):

{
  "status": true,
  "message": "Video is completed",
  "data": {
    "db_id": "uuid",
    "status": "completed",
    "url": "https://signed-url.mp4"
  }
}

Response (Failed):

{
  "status": true,
  "message": "Video is failed",
  "data": {
    "db_id": "uuid",
    "status": "failed",
    "reason": "Video generation failed"
  }
}

8. Connect MakeUGC MCP (Claude Code / Desktop)

Use MakeUGC from Claude via the MCP server at https://mcp.makeugc.ai. You need a Platform API key from Settings → API Integration and an active subscription.

Claude Code (recommended)

claude mcp add --transport http makeugc https://mcp.makeugc.ai \
  --header "X-API-Key: YOUR_MAKEUGC_API_KEY"

claude mcp list
# In session: /mcp → makeugc should show connected

Put --transport and --header before the server name. Or use OAuth (no key in config):

claude mcp add --transport http makeugc https://mcp.makeugc.ai
claude mcp login makeugc
# Paste your Platform API key on the consent page → Approve

Claude Desktop / claude.ai

Prerequisite: a Platform API key from Settings → API Integration.

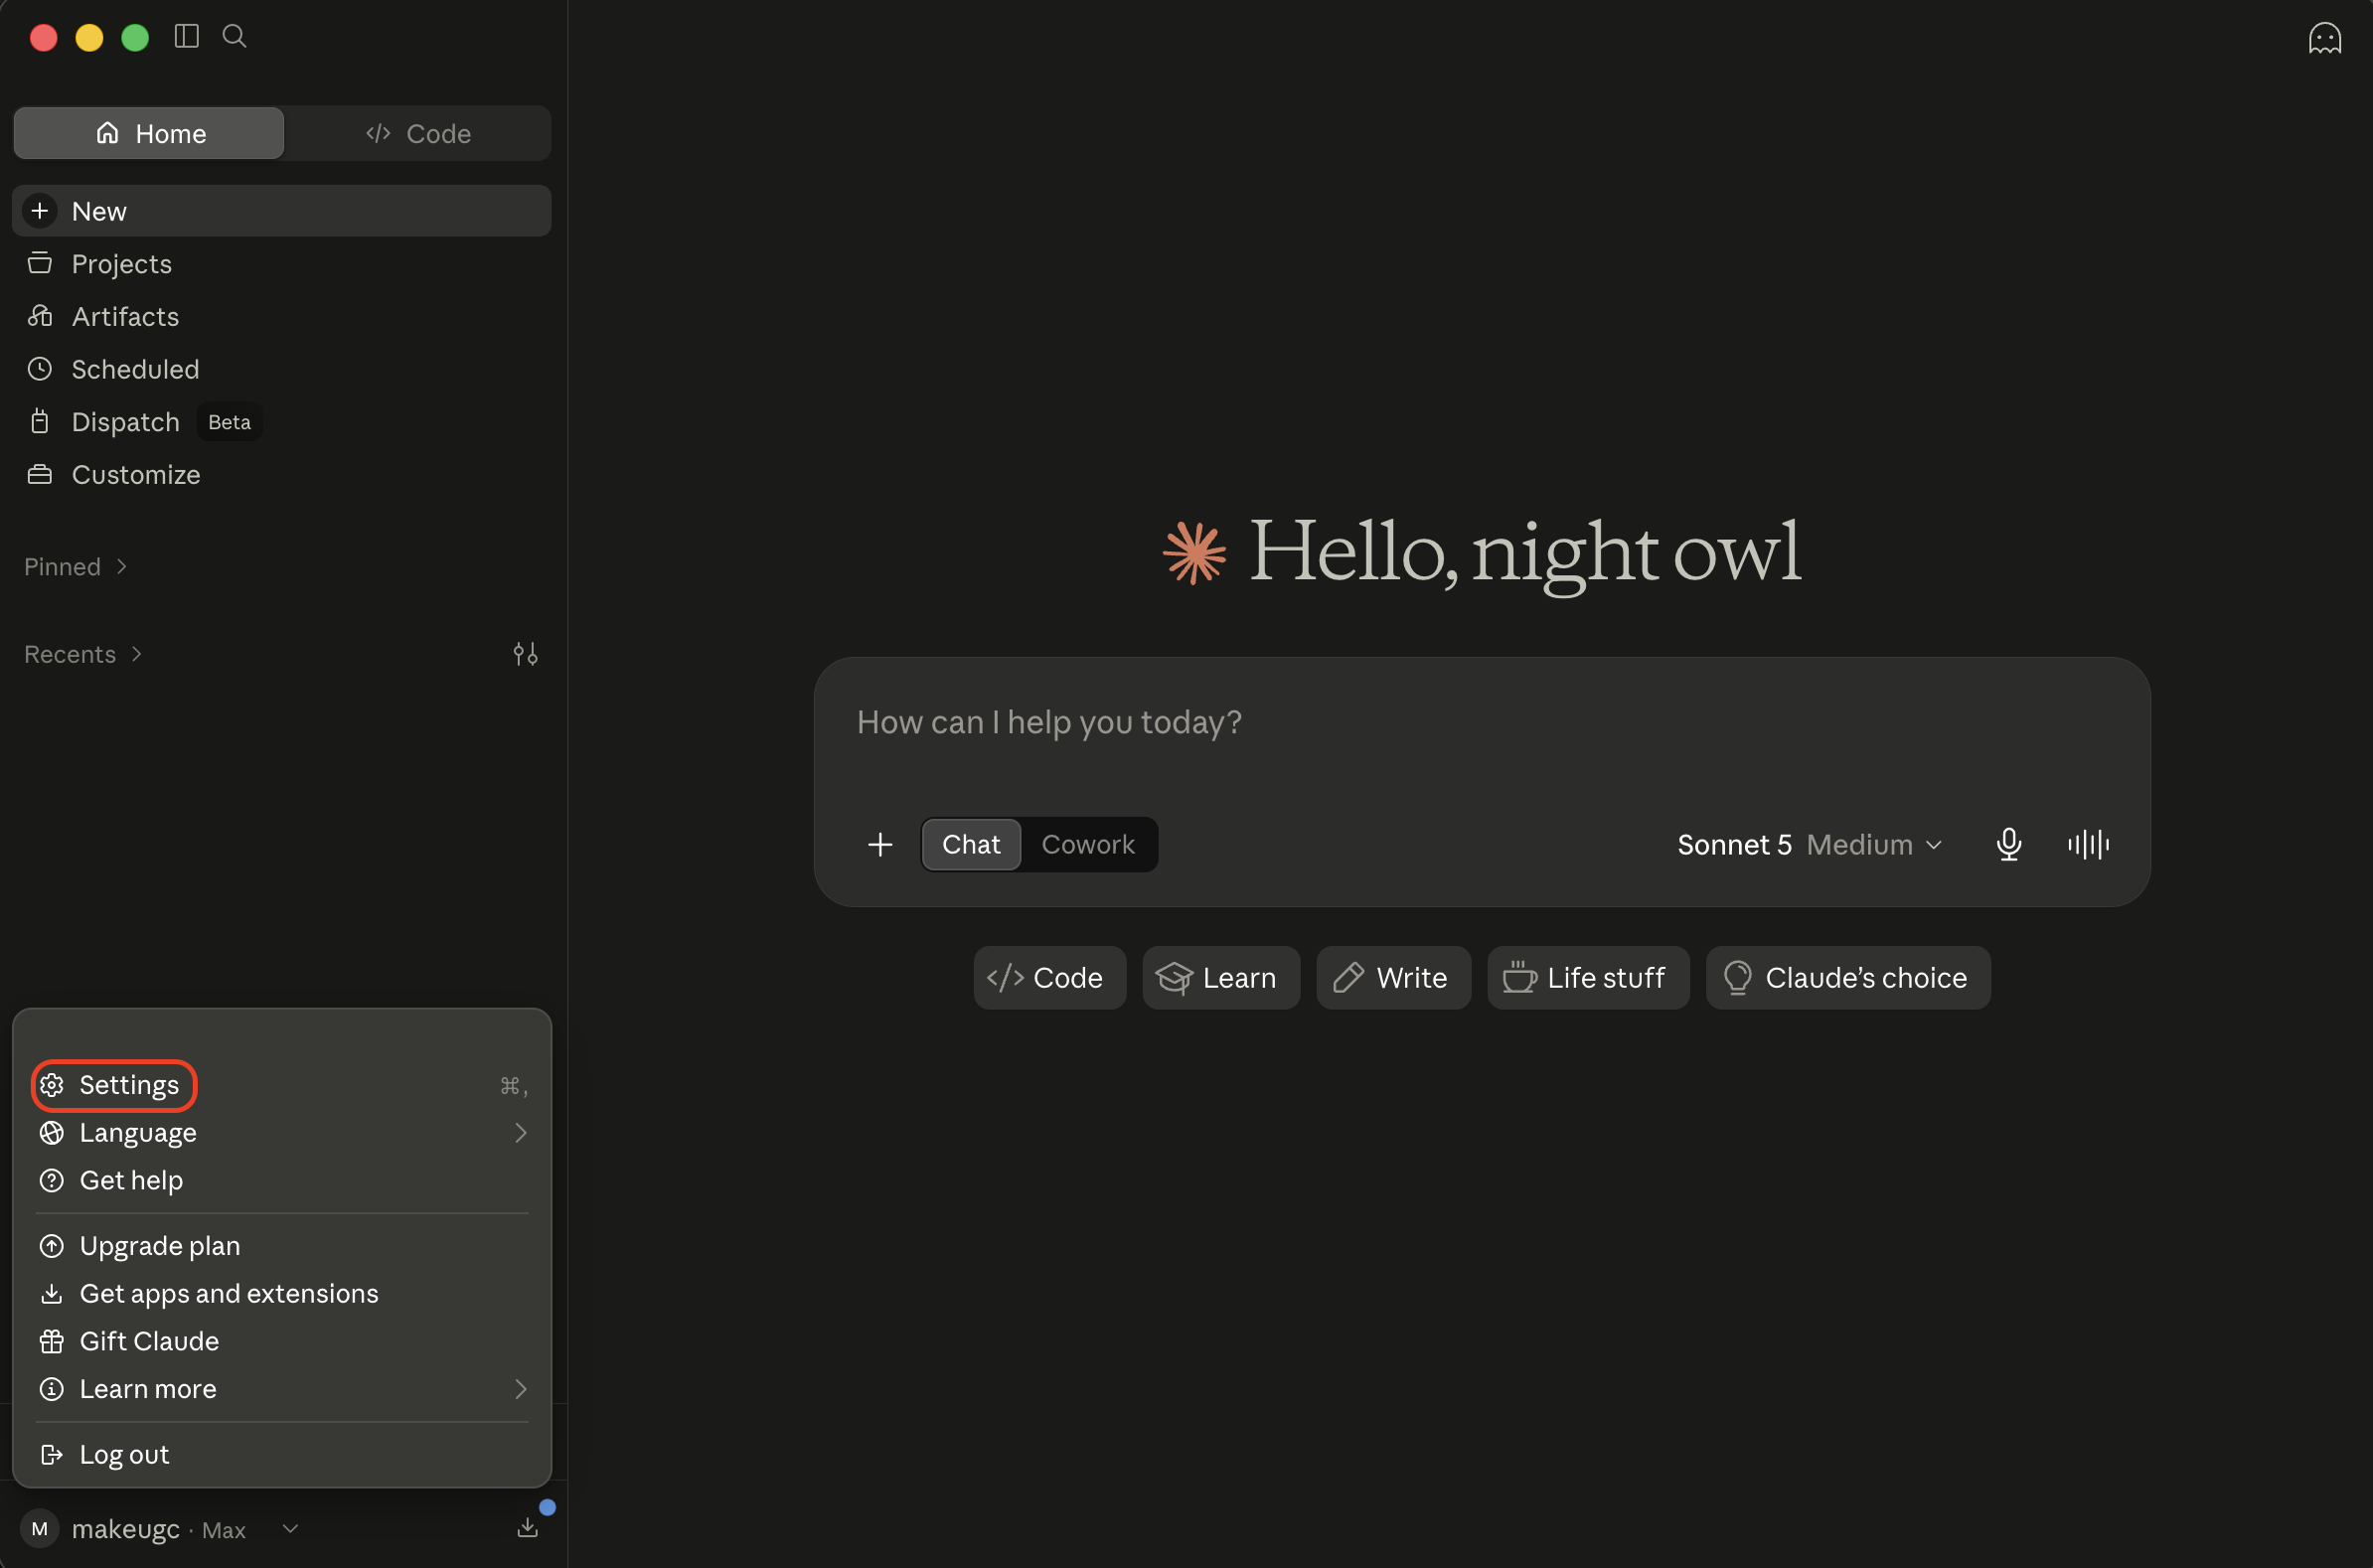
Step 1 — Open Settings

In Claude Desktop, open your profile menu and click Settings.

Claude Desktop: open Settings

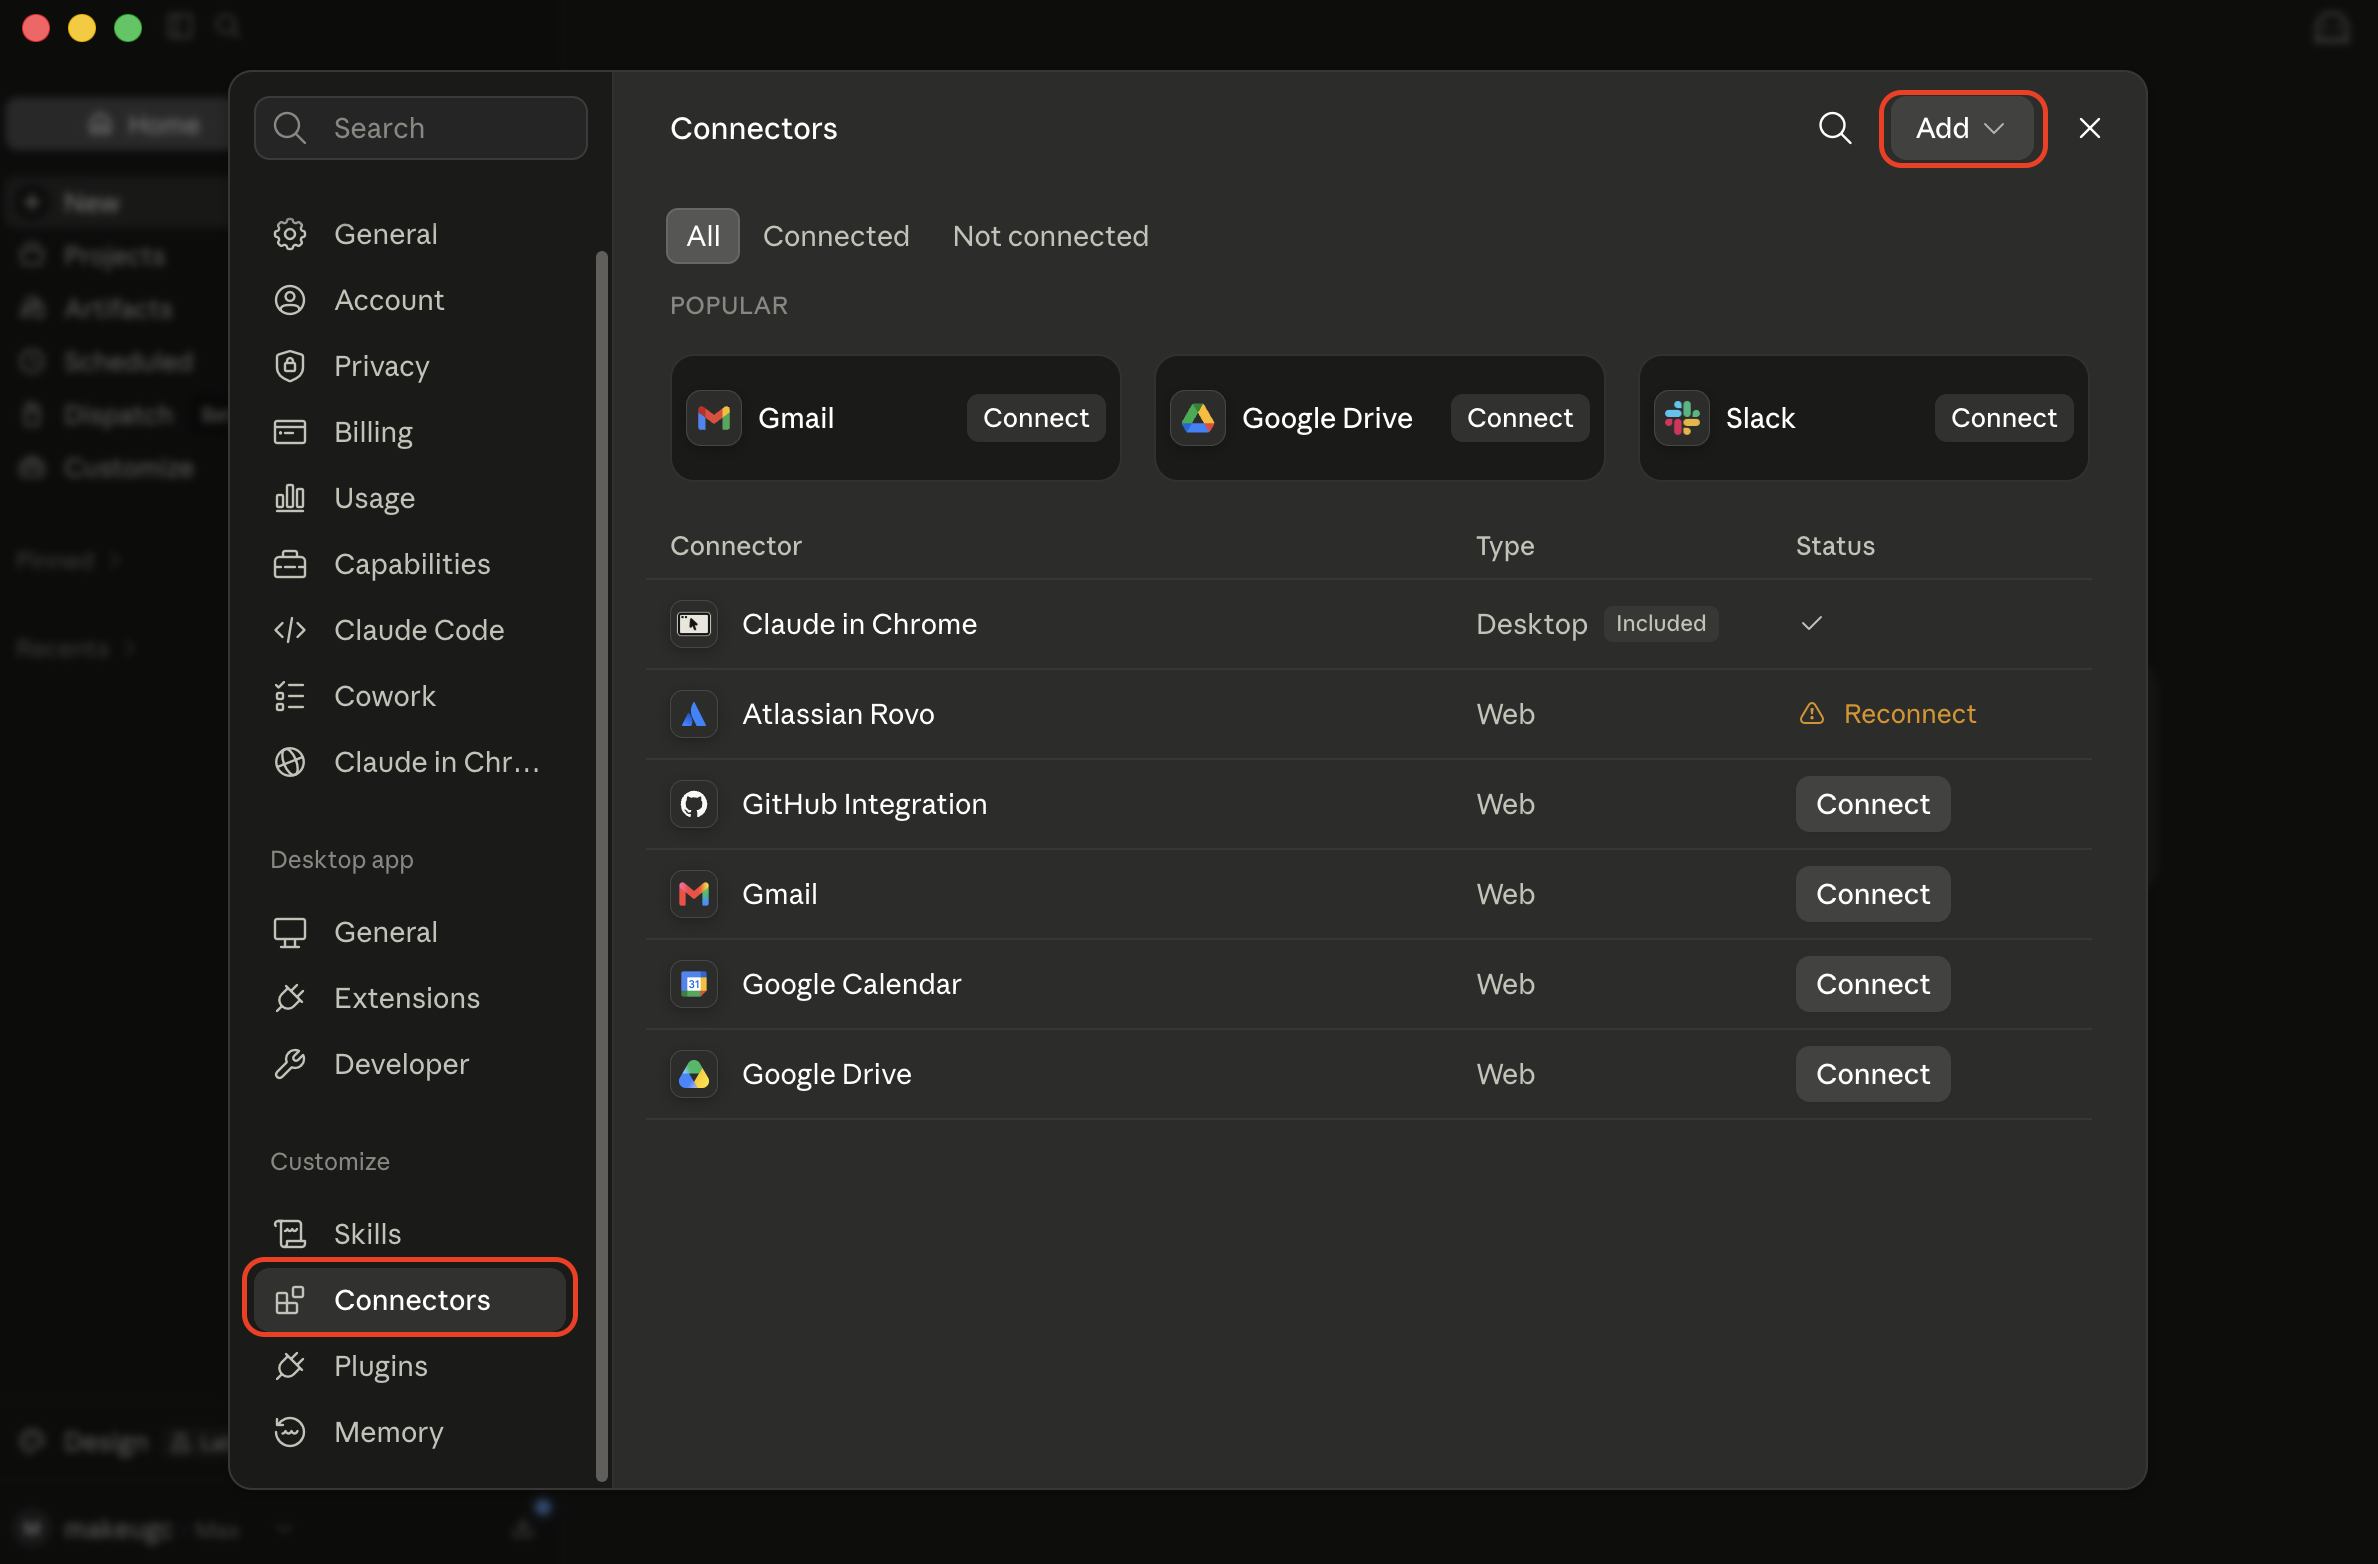
Step 2 — Connectors → Add

On the settings page, open the Connectors tab, then click Add.

Claude Desktop: Connectors tab, Add button

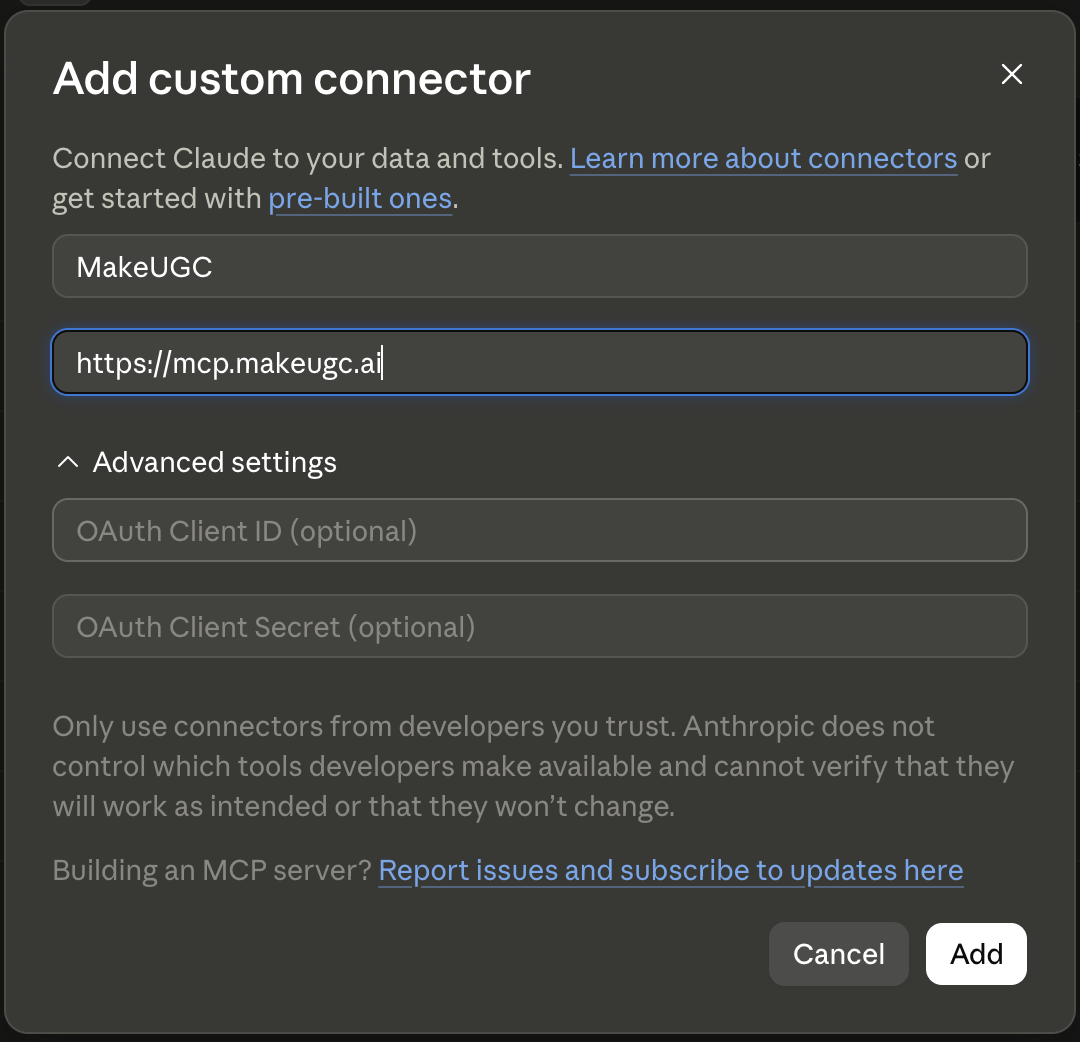
Step 3 — Add custom connector

Enter connector name MakeUGC and remote MCP server URL https://mcp.makeugc.ai, then add the connector.

Claude Desktop: Add custom connector with MakeUGC and https://mcp.makeugc.ai

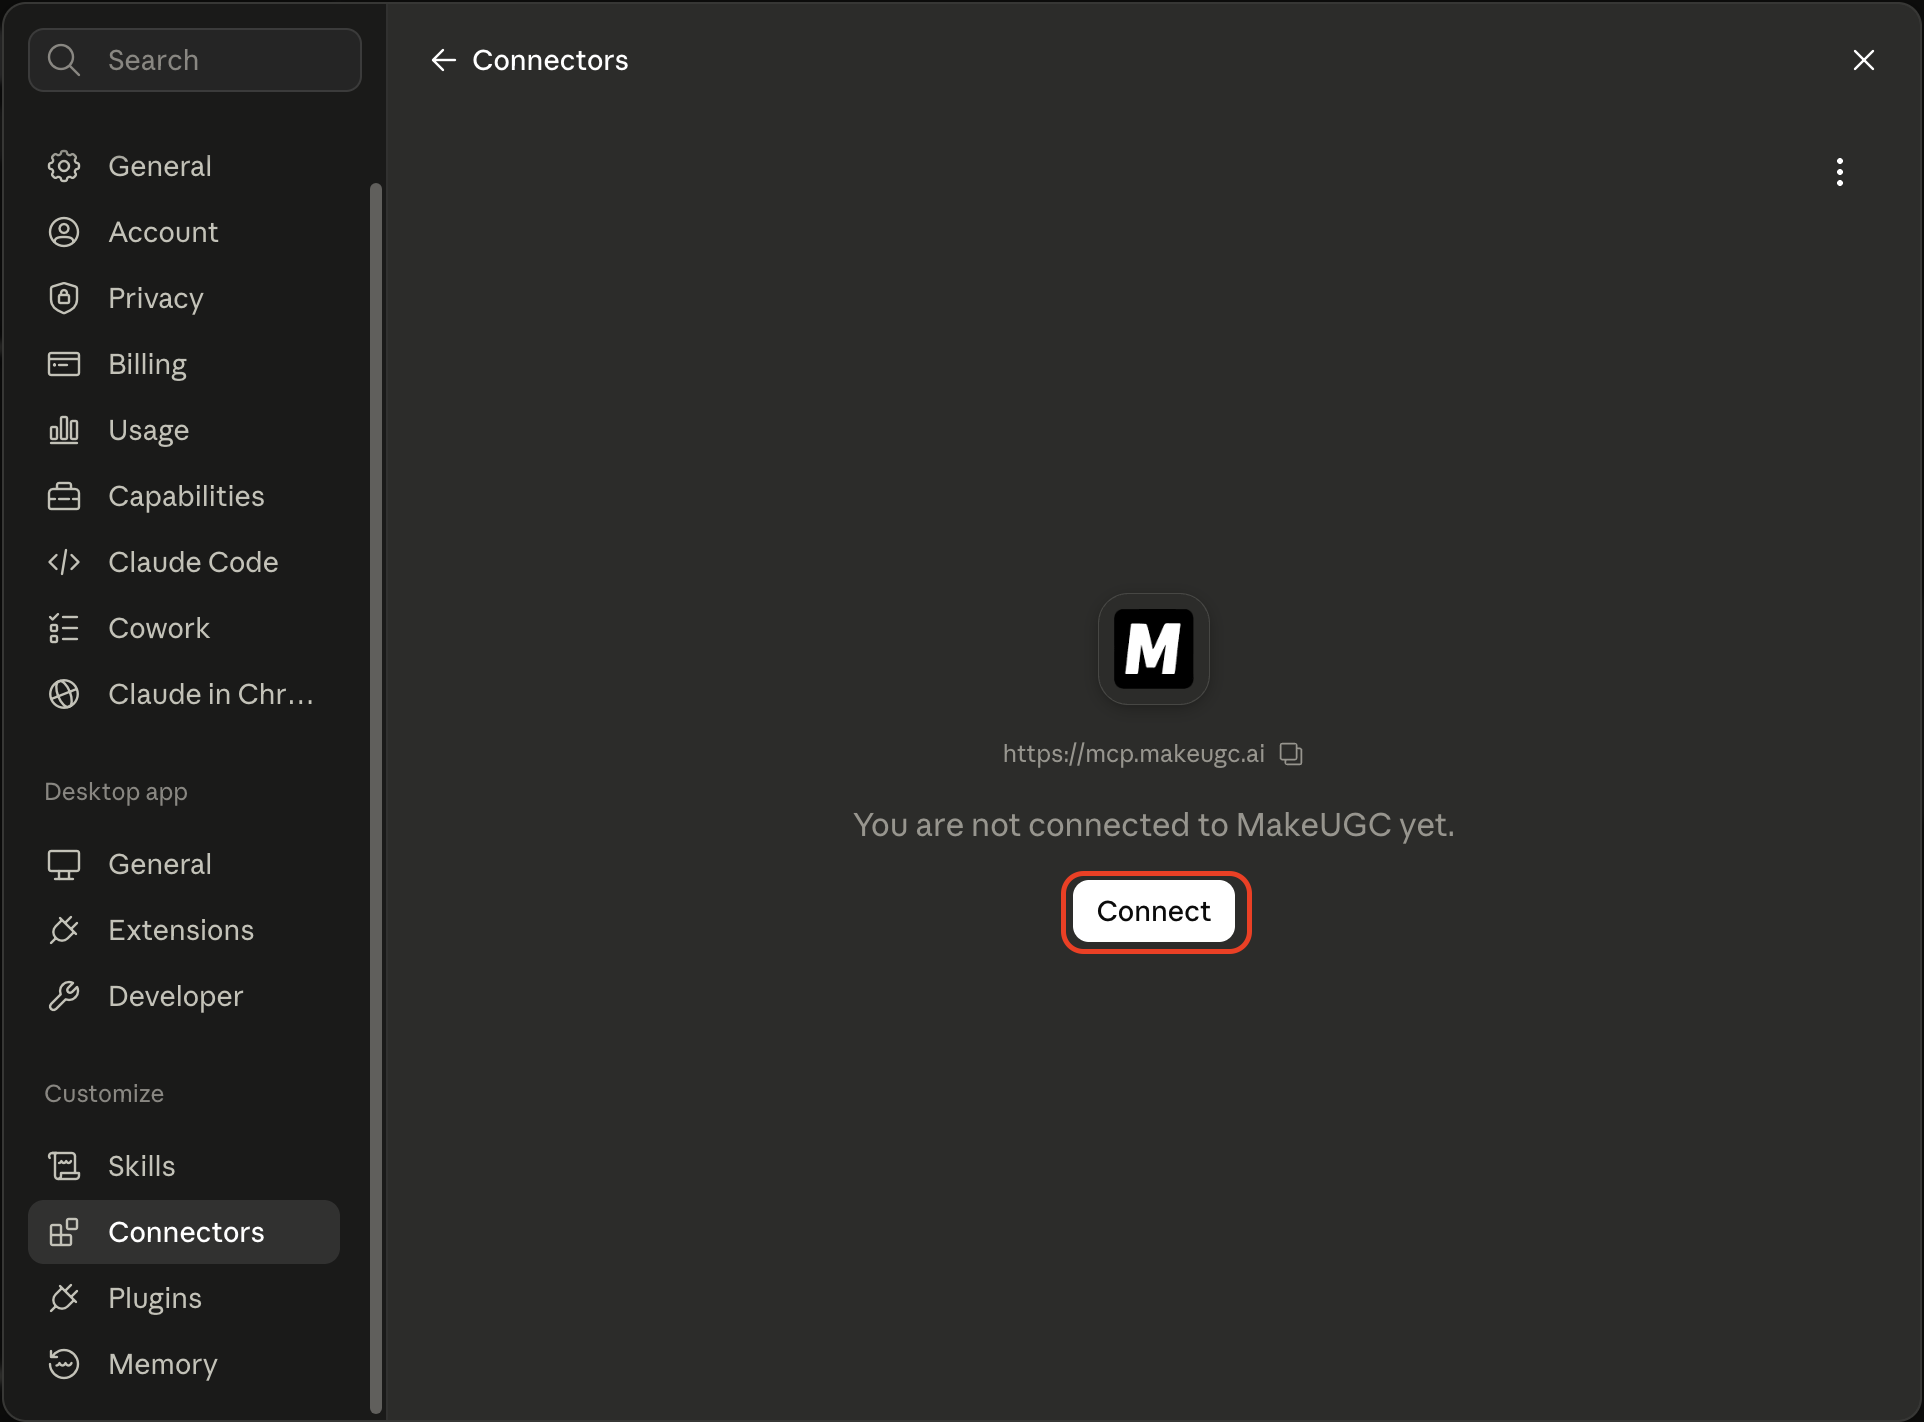
Step 4 — Connect

After the connector appears in your list, click Connect.

Claude Desktop: click Connect on the MakeUGC connector

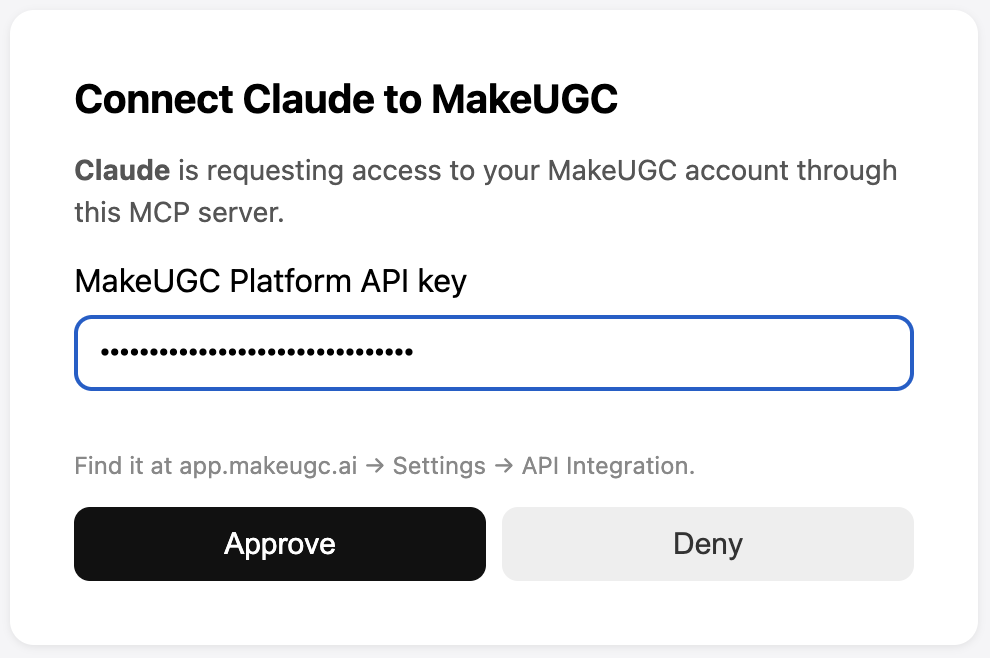
Step 5 — Enter API key and Approve

Paste your MakeUGC Platform API key, then click Approve.

Claude Desktop: enter MakeUGC API key and Approve

Done

In a chat, open +Connectors and enable MakeUGC. Ask Claude to list MakeUGC flows or models.

Claude Desktop via config file (optional)

If you prefer not to use Custom Connector, edit claude_desktop_config.json (Settings → Developer → Edit Config), then fully quit and reopen Desktop:
{
  "mcpServers": {
    "makeugc": {
      "command": "npx",
      "args": [
        "-y",
        "mcp-remote",
        "https://mcp.makeugc.ai",
        "--header",
        "X-API-Key:YOUR_MAKEUGC_API_KEY"
      ]
    }
  }
}

Do not put a raw "url" field in Desktop config — use Custom Connector or the mcp-remote config above.

Verify

After connecting, ask Claude to list MakeUGC flows or models. In Claude Code, /mcp should show makeugc as connected with tools available.

Troubleshooting

Support

For API support or questions, please contact: